
from the ground - up
 11-11-2003 | 09:57 PM
#1

Thread Starter
I have a present for you...
Joined: Mar 2003
Posts: 1,695
From: dayton, nevada usa
from the ground - up
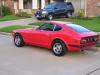
My '70Z.
So far I've got the R200 (3.9) matching 5-speed, shortened shifter. All urethane bushings. Tokico lowering springs and shocks, sway bars. '82 zxt rear disc, even got the stock parking brake to hook up with a little mod. 4 piston Toyotas on the front, made my own adapters for the '84 rotors. I made my own adapters for the TSW 17's out of 7075 T-6 aluminum. Seats are done, carpet kit. Restoring the dash, so far so good. Got a coated header to put on. Vitaloni mirrors. ZX Electonic ignition. Stock engine is ok for now. It's been up on stands for 11 months now. I think I'll drive it for a while!
I sincerely would like to thank everyone who has shared their experience and ideas on this site, it made the job a lot easier!
Tom
 02-29-2004 | 07:56 PM
#3
Thread Starter
I have a present for you...
Joined: Mar 2003
Posts: 1,695
From: dayton, nevada usa
Dash repair
Sorry ZCHIEF! I've been trying to attach pics but it won't work (manage attachments) button. I must be doing something wrong or this new format isn't ready yet. I bought a kit from Eastwood, a waste of time and money except for a spray can of insulating foam used to fill the cracks which you can buy a the hardware store. I used a sharp hunting knife to cut the cracks back below the dash surface. Then I shot the foam in and waited for it to dry. I sliced it with the knife, a razor was to choppy. Then I sanded it with 60 grit paper. I bought a can of liquid neoprene sealer and spread it over the dash by pouring it on then spreading it with a paint brush. One day to dry between coats. I found I could sand it with baby oil and 180 grit wet or dry. It looks alot better than it did when I could stick my fingers it the cracks! I stopped working on it when the weather got cold and will resume this spring. I need to figure out a way to get a nice looking texture on it. Send me you email address via PM and I will send you the pics of what I have done so far.
03-10-2004 | 12:08 PM
#4

Registered User
Joined: Oct 2003
Posts: 123
From: boise, id
Originally Posted by ZChief
Theramz
How did you do the dash refurb? I have two cracks in my 70 dash and would like to repair it if possible (instead of replacing it).
How did you do the dash refurb? I have two cracks in my 70 dash and would like to repair it if possible (instead of replacing it).
03-10-2004 | 08:03 PM
#5
Thread Starter
I have a present for you...
Joined: Mar 2003
Posts: 1,695
From: dayton, nevada usa
brake and suspension upgrade
Here is some pics of what I did to the front end.
1) urethane bushings, new tie rod ends, ball joints, Tokico springs and shocks, bump steer spacers and S13 caliper mock up.
2) rotor adapter, note step to centralize rotor.
3) rotor installed.
4) wheel adapter installed, note step to centralize wheel.
5) bad girl grounded. Still ugly but I have plans for that!
I will post some pics of the rear disc upgrade later.
Last edited by theramz; 03-10-2004 at 08:18 PM. Reason: add file
03-12-2004 | 06:50 AM
#6

The Evil Twin
Joined: Mar 2001
Posts: 9,296
From: Seattle, WA
 Wow! sweet drivetrain and suspension setup! I'm very jealous. Looks good too, and I like the spacer you made for the rotor... did you get a proportioning valve for the rear brakes to get them adjusted to the front properly or do they work ok like they are now? Disc and drum brake line pressure varies.
The one thing that worries me is your spacer for the wheel. You just made an aluminum spacer with four holes and double-length wheel studs... correct? That's not the best way. Usually you want short studs. That's why aftermarket spacers bolt to the hub, then the spacer has four studs offset that bolt the wheel up. Your method may be ok, but I'm not sure...
Last edited by Bleach; 03-12-2004 at 06:53 AM.
03-14-2004 | 07:17 PM
#7
Thread Starter
I have a present for you...
Joined: Mar 2003
Posts: 1,695
From: dayton, nevada usa
Originally Posted by BleachZee
Wow! sweet drivetrain and suspension setup! I'm very jealous. Looks good too, and I like the spacer you made for the rotor... did you get a proportioning valve for the rear brakes to get them adjusted to the front properly or do they work ok like they are now? Disc and drum brake line pressure varies.The one thing that worries me is your spacer for the wheel. You just made an aluminum spacer with four holes and double-length wheel studs... correct? That's not the best way. Usually you want short studs. That's why aftermarket spacers bolt to the hub, then the spacer has four studs offset that bolt the wheel up. Your method may be ok, but I'm not sure...
03-17-2004 | 08:21 PM
#8
Thread Starter
I have a present for you...
Joined: Mar 2003
Posts: 1,695
From: dayton, nevada usa
Rear adapters and disc brakes
Okay finally got the pics.
Adapters for the 17" Revos, '82 turbo disc swap.
I used '81 Maxima brackets. I was able to save the rotors but rebuilt the calipers. I took the original ('70) e-brake cable brackets, cut them down and remounted them for the early cables. I criss-crossed them to make up the length and the ebrake works perfectly. Since the calipers mount forward, I switched them left to right so the bleed valve is up. I switched the inboard pistons to make the e-brake levers line up. I had to cut the cable guides off the caliper brackets. I just read this and it is confusing to me too.
03-18-2004 | 10:09 AM
#9
The Evil Twin
Joined: Mar 2001
Posts: 9,296
From: Seattle, WA
Looks good! Ok, if you think you know what you're doing with the wheels spacers that's fine. I was concerned with the strength of the studs, not the balancing. You've got extra long studs here and the pressure on them starts halfway down on the bolt... I hope you got the strongest wheels stud you can buy.

On the rear Maxima brake brackets, I've heard of those being a bolt-on conversion. With the Maxima brackets and 280ZX calipers, was there anything you had to modify or adjust or was it a bolt-on process? It looks like you didn't even have to space the caliper on the bracket with a washer.
On the rear Maxima brake brackets, I've heard of those being a bolt-on conversion. With the Maxima brackets and 280ZX calipers, was there anything you had to modify or adjust or was it a bolt-on process? It looks like you didn't even have to space the caliper on the bracket with a washer.
Last edited by Bleach; 03-18-2004 at 10:14 AM.
03-18-2004 | 06:21 PM
#10
Thread Starter
I have a present for you...
Joined: Mar 2003
Posts: 1,695
From: dayton, nevada usa
studs, brackets
These studs are available from Summit and are what I see with 1 1/2" thick spacers at the dirt race track.
Brakes-
The whole thing bolted right up. The hard part was removing the brackets from the Maxima with it on its belly. Unbolting the axle nut was impossible so I took the whole swing arm home and did it with a 3/4 breaker bar and 3' long cheater bar on that. On my Z I used a 1 1/2 square tube between the wheel studs against the floor and the breaker bar to crack it loose. My impact gun couldn't do it. Before I installed them I blueprinted them and made 2 sets out of 7075-T6. This was also a lot of work but easier than the junk yard routine.
Last edited by theramz; 03-18-2004 at 06:40 PM. Reason: add answer
03-19-2004 | 09:31 AM
#11
The Evil Twin
Joined: Mar 2001
Posts: 9,296
From: Seattle, WA
You made spare sets!? wow, that's a good idea. I've actually got an '84 Maxima... well, like you couldn't read that on every post of mine. I suppose if I take mine apart I could just use the brakets to make spare sets and then put the car back together so my wife can drive. 
I hope those wheel studs hold up well. Do you have part numbers for those? or specs on what I should search for on Summit?
I hope those wheel studs hold up well. Do you have part numbers for those? or specs on what I should search for on Summit?
03-19-2004 | 10:04 PM
#12
Thread Starter
I have a present for you...
Joined: Mar 2003
Posts: 1,695
From: dayton, nevada usa
bad news
Sorry man, only the '81 Maxima had these brackets. After that year it they were front wheel drive.
The extra long wheel studs from Summit are grade 10. You can buy different lengths. I used the 2 1/2" with a 1.25mm pitch on the front to fit the Revo lug nuts. I used the 1.5mm pitch on the rear to hold the adapters on because the lug nuts I used had to be faced off. Reason for this was to have a thick section of aluminum to bolt against the axle and still have 2 times the diameter of thread length engaged. The 2 1/2" length was a little to long so I cut them off flush with the lugs.
Here is a foggy dream I had about my 240Z Skyline Roadster-
Last edited by theramz; 03-09-2005 at 10:26 PM.
04-01-2004 | 02:56 PM
#14
Thread Starter
I have a present for you...
Joined: Mar 2003
Posts: 1,695
From: dayton, nevada usa
$5 fuse box upgrade
I got a fuse box out of a 200sx and spliced in my OEM loom. I chose this one because it would fit under the console, provided a few more leads for upgrades and had a lable for reference. I made a map of what went where and seperated the wires into groups. I soldered the wires together and used shrink wrap on the joints. Then I wraped them in the yellow conduit you see in the picture. It took a few hours to do but it is very flexible now and it plugs right into the dash loom. It passed the smoke test with no problems.
05-07-2004 | 12:16 AM
#15
Thread Starter
I have a present for you...
Joined: Mar 2003
Posts: 1,695
From: dayton, nevada usa
Ashtray? we don't need no stinking ashtray!
I decided I would rather have something I could use. So I got a piece of sheet metal and some stuff from Radio Shack and made this panel with rocker switches for fuel pump, amp, alarm and charger/whatever. I moved the $5 fuse panel over to the right of the heater.
Last edited by theramz; 05-12-2004 at 11:04 PM. Reason: add picture and text
08-02-2004 | 11:26 PM
#16
Thread Starter
I have a present for you...
Joined: Mar 2003
Posts: 1,695
From: dayton, nevada usa
update
Well, finally got everything working good enough to drive to work everyday! The suspension work really paid off big, corners like a go-kart. Won't need the proportioning valve for the brakes. Stood on them at 85 mph and to my shock it stopped like it got caught on a aircraft carrier cable without locking up the tires! Ran 2 1/4 pipe from the POS header to a SuperTrapp muffler, sounds great. I'm so glad to be able to drive it after being up on stands for almost two years I'm going to leave it looking ugly until winter time and then start on the body.
Last edited by theramz; 01-06-2005 at 02:58 PM. Reason: Add pic

Thread
Thread Starter
Forum
Replies
Last Post
Bookmarks


